Tuesday, November 12, 2013

Cauliflower Bread


I had to use up the last of the Cauliflower I grew this year before it went bad.  So on to the internet to find a recipe. I found this recipe at http://gastromony.com/cauliflower-bread/ and I thought, what do I have to loose.  This recipe was like making pancakes, it was that easy.  After they were done cooking my husband, my neighbor and I all tried a patty/slice and to our surprise it was good and it didn't weigh you down. It was a nice light little meal that I believe I will cook again.  The only thing I have to warn you about is the cooking time. The thickness of your patties will affect your cooking time. So don't assume you will cook them for the first 40 minutes then flip them to cook another 10 minutes.  I cook mine for 27 minutes on the one side, flipped them and cooked for an additional 8 minutes.  Enjoy!


Cauliflower ‘Bread’
 
Ingredients
  • ½ small cauliflower, trimmed of core
  • one egg
  • ¼ cup mozzarella cheese and Parmesan blend (you can just use mozzarella)
  • 1 tsp dried oregano
  • salt and pepper to season
  • 1 tsp olive oil
Pre-heat oven to 320.
Instructions
1. Place cauliflower pieces in TMX bowl and blitz on Speed 7 for 5 seconds until cauliflower is finely chopped. You want your cauliflower to be small as possible

2. Add egg, cheese, oregano and seasoning and mix together by hand until will combined or you can use a 
mixed


3. Line a baking sheet with baking paper and use olive oil to grease.
4. Place spoonfuls of the cauliflower mixture on sheet and spread out into circles, around 1cm in height.


5. Bake for 40 minutes until slightly dried out, browning, and firm to the touch.
6. Remove from oven and using a spatula carefully peel away from baking paper. Flip over and return to oven 10 more minutes


 Serve immediately where possible.


Saturday, November 9, 2013

Pecan Pie

I'm not a big fan of sweet desserts but for what ever reasons I make an acception when it comes to Pecan pie.  Pecan pie is that irresistbly sweet dessert everyone loves to eat around Thanksgiving, Kentucky Derby day or at any other day of the year. 
I even have been known to run 5 miles on the treadmill and treat myself to a piece of pecan pie after weres.  I know it's counter productive as to why treadmills were invented, but I don't care. I've tried several different recipies and this is the one I like the best that I found on  "The Art of Cooking" website.  Normally I make my own short dough pie crust for my desserts, but I was excited to try this recipe, so I used a store bought shell. 
 
                          
3/4 teaspoon vanilla extract (I used vanilla bourbon extract) 
1 cup white sugar                    1/3 cup salted butter melted
1/2 teaspoon salt                      1 cup dark corn syrup
3 Tablespoon brown sugar     1 cup chopped Pecans
3 eggs beaten                            1 unbaked pie crust (handmade or store bough) a tart pan or pie dish

1. layer the pie crust with the chopped pecans

2. mix the sugar, brown sugar, salt, corn syrup, butter, eggs, and vanilla together in a bowl
3. pour the mixture into the pie shell, make sure you cover all the pecans with the filling.  The pecans will float to the top.
4. cover the pie with tin foil, loosely 
 5. bake at 350 degrees for 30 minutes.  Remove the tin foil and bake for an additional 20 minutes.  Keep an eye on the pie to make sure the crust does not burn

Baking times vary when baking with pecan, so keep an eye on it.  The pie should be slightly giggly in the center, but not overy giggly.  If the center seems too giggly you can bake it for an additional 20 minutes, but keep an eye on it, you may not need the full extra 20 minutes, this depends on your oven. 

Wednesday, November 6, 2013

Sewing for Babies


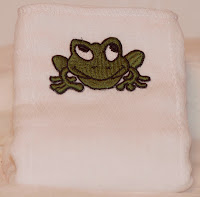
Another hobby of mine, sewing.  I just adore baby clothes, cute little embroidery designs and matching outfits.  I created this little gift basket that I call "little froggies."  The baby in the matching hat and booties is one month old and I think the outfit matches his little buddha belly.  

Yes, I have named the different parts of a baby, itty bitty ant hills for the chest area, little muskals (that is the way I spell it) for the arms, thunder thighs, 
buddha belly and of course itty bitty butt. 
In the gift basket is a matching hat, booties, bib, burp cloth and a onesies.  Each item is for different stages of the baby's life because they seem to grow about a foot a day.  And since I like my shoes to match my shirt I think any mother who thinks like I do would love to see their baby items matching as well.   


Tuesday, October 29, 2013

Lasagna Roll Ups


Lasagna, comfort food for the winter months.  I found this recipe on the web and thought I would give it a try.  The flavor was good, but it was missing that wow factor that I like in food (flavor that burst in your mouth, not just a mild taste of flavor).  Don't get me work, this recipe has potential and on a scale of 1 -5 I would give it 2.75.  With additional herbs added to the recipe and pureeing the sauce, this recipe could easily rise to a 5.  Changes I made to the recipe were, using fresh spinach instead of frozen and I didn't use 10 oz of spinach either because I didn't want a mouth fall of spinach.  I have never had artichoke before so I wanted to make sure the flavor of the artichoke came out.  The portion size was just right, 1 1/2 rolls and I was stuffed.


1. Preheat the oven to 350 degrees F. Bring a large pot of water to a boil. Add the salt and cook the lasagna noodles to al dente, according to package directions. Drain and carefully lay the lasagna noodles out flat on a large piece of parchment paper. Let sit to cool.


2. In a medium bowl, combine the ricotta cheese, egg, garlic, spinach, artichoke hearts, parmesan cheese, basil, crushed red pepper, and nutmeg. Stir until well combined. Season with salt and pepper.


3. Take about 1/4 cup of the ricotta spinach mixture and spread it evenly onto each lasagna noodle. Top each noodle with 2 tablespoons of mozzarella cheese and 2 tablespoons of marinara sauce. 


4. Spray a 9x13 baking dish with cooking spray. Line the bottom with marinara sauce, about 1/2 cup. Set aside.


5. Carefully roll the noodles up and place them in the prepared pan 


6. Top the lasagna rolls with the remaining marinara sauce and mozzarella cheese. Spray a large sheet of foil with cooking spray and cover the pan.

7. Place the pan in the oven and bake for 35 minutes. Remove the foil and bake for an additional 5 minutes, or until the cheese is melted on top. 
Remove from the oven and let sit for 5 minutes. Serve warm

ingredients:

12 lasagna noodles
1 teaspoon salt
2 cups ricotta cheese
1 large egg
2 cloves garlic, minced
10-ounces frozen spinach, thawed, drained, and squeeze to remove water
1 cup chopped canned or jarred artichoke hearts
1/4 cup parmesan cheese
1/4 teaspoon dried basil
1/8 teaspoon crushed red pepper flakes
Pinch of nutmeg
Salt and freshly ground black pepper, to taste
2 cups shredded mozzarella cheese
4 cups Easy Marinara Sauce or your favorite sauce

Note: To prepare the lasagna rolls in advance, roll them up, add the sauce and cheese and cover with foil and place in the fridge until ready to bake. I've made them a day before baking and they were still great. To freeze, bake and let cool to room temperature. Place in a freezer container and freeze. Reheat in the microwave. You can place a whole pan in the freezer and heat back up in the oven, but I like to freeze the rolls in individual servings for easy lunches and dinners.

Wednesday, October 23, 2013

Tomato Soup for a cold winter day

Temperatures are getting close to the freezing point, so I decide to pull the last of the tomatoes indoors and move everything else into the green house so I could get an extra month of harvesting.  Now that I have all these tomatoes, what to do with them?  I stubbled upon a Tomato soup recipe on pinterest and decided to give it a try.  My coloring of the soup  was more on the orange/redish side and I think that is because I didn't use enough tomatoes. Even though the recipe called for 4-5 tomatoes it didn't really tell you the size of tomatoes to use, I thought I would play it safe and I used 6 small tomatoes. The flavor of the soup was excellent, especially if you compare it to the store bought canned tomato soup.  Store bought soup tends to be a bit watering and this tomato soup I made is nice and creamy and has some thickness to it.  So, grab yourself a book and curl up to a nice bowl of tomato soup.


Fresh Tomato Soup

1 tbsp olive oil 
1/2 c onion, chopped
2 tbsp minced garlic 
4-5 c chopped ripe tomatoes, seeded (you can sub in some canned, if needed)
2 c chicken broth (or 2 c water and 2 chicken bouillon cubes)
2 tbsp butter
2 tbsp flour
2 tsp sugar
1 tsp balsamic vinegar
1 tsp dried basil
1/2 tsp (+) salt
pepper to taste

 1. Heat olive oil in stock pot, and cook onions and garlic til tender, but not browned. Add chopped tomatoes and chicken broth and simmer for 20-25 mins. Remove from heat and use food mill, immersion blender or regular blender to carefully puree mixture.

2. In separate small skillet, melt butter and add flour, cooking til light golden brown. Whisk in 1 cup of pureed tomato mixture slowly, ensuring that the mixture doesn't clump. When tempered, add mixture from skillet to the stock pot.

3. Add sugar, vinegar, basil, salt and pepper, and simmer 5 more minutes. Season to taste.


Monday, October 21, 2013

The leaves are changing colors, the air is cooler and it’s time to harvest the pumpkins for homemade pumpkin puree and doggie treats.  If you ever have the chance try a slice of a store bought pumpkin pie and homemade pumpkin pie at the same time, you will be amazed with the difference in flavor.  Homemade pumpkin pie with homemade puree has a sweeter taste that kinda pops in your mouth at the end of a bite.  It truly is delicious! This is how I make my homemade pumpkin puree for pies and yes I also use it when I make my homemade doggie treats.  My dogs go crazy for these treats! I gave my neighbor some of these doggie treats and she told me her dog was crazy for them as well.
 
What you will need: cutting board, sharp knife, spoon, tray with a lip, cooling rack, blender, bowl and a baking pumpkin not a regular pumpkin that you put out for Halloween.


Slice your baking pumpkin in half with a sharp knife.  The half on the left has been scooped out and the one on the right has not.  You will want to scoop both halves middle section up where the seeds and the stringy stuff is.  I save my seeds so I can use them the following year for planting.


Cut your halves into quarters and place them on top of the cooling rack that is sitting inside of your tray that has a lip.

Place your tray in the oven at 300 degree, pour some water into the bottom of your tray and steam bake for about  1 ½ hours (the length of time will depend upon how your oven cooks and the size of the pumpkin)


When you can stick a fork through the top of each quarter with the least amount of effort that quarter is done baking (not all quarters bake at the same rate).


The skin of the pumpkin should literally fall away from the sides


Once all the skin is removed you are left with a big piece of pumpkin


Place this piece of pumpkin into a blender (my picture shows a food processor because my blender decided to die).  The setting should be set for puree.  When there are no lumps in your puree, you are finished. 
 
HAPPY BAKING!
 

Saturday, October 19, 2013

Fender Guitar Table


Well winter is fast approaching so all outdoor projects must come to an end.  This is the last of the projects for the season that my daughter and I did for her boyfriend.  Her boyfriend has 3 guitars so she thought it would be fitting to have a coffee table in the shape of a guitar head.  The only thing we had to guide us, was one of his guitars and our free hand drawing skills.  We also used a printer, scissors, pencil and paint.  Once all the templates were created we simply taped the templates down to the wood and traced the templates with the pencils.   We then painted everything and once it was dry several coats of varathane was applied. If I had to do over again I would only add a fourth leg for more stability.  


Wednesday, October 16, 2013

Pretty in Pink


Today is what I am calling a pink day. I purchased this flannel material awhile ago, I really liked how the pink and brown actually went well together. Well, today I had a brain storm on what to do with the fabric, create a gift basket! I liked the way the word "BABY" was done on the material so, I decided to reproduce it so my embroidery machine could stitch it out on different fabrics. I then embroidered the word onto some cotton fabric (bib) and some pink fleece material that I decided I would make a baby hat from. I added an elastic band at the hat hem line along with a flower. This elastic will allow the hat to stretch so the baby can get more then just one or two uses out of it. Of course I had to add a matching burp cloth to complete the set. I really like how everything pulled together in an elegant modern way. If you would like to purchase this gift basket you can find it at www.slurpsnburps.com or on esty.com


Tuesday, October 15, 2013

Baby Mittens


Tiny Twisted Mittens

I originally found this pattern on http://www.ravelry.com/.  If you are not aware of this web site, it's heaven for knitters and crocheters.  You will find lots of free patterns and patterns that you will have to pay a few dollars for.  I knitted these little mittens in a red glitter (hard to see the glitter in the yarn from the photo) yarn for Christmas.  Now all I have to do is make a matching dress, hat and booties.  Creating never stops.


Saturday, October 12, 2013

Lace baby booties


Purple is my birthstone color, so when I saw the pattern for these lace baby booties, I knew they would look great in Purple.  


This is what your work should look like before you begin the instep rows.


This is what your work should look like after you completed the instep rows.


After you completed your foot sections, this is what your work should look like.  I provided the front, side and top view.


If you have any questions please don't hesitate to ask by leaving a comment.  And, please feel free to leave a comment if you see something wrong with the pattern or just to say you like the pattern.

Happy Knitting!

Tuesday, October 8, 2013

Crochet Flowers

These little flowers are a nice addition to any crochet project.

I don't assume everyone knows how to crochet or the terminology.  For the life of me I can never remember what the Garter St is in knitting, so I always have to look it up before I begin a project.  I hope this step by step tutorial with pictures will help you with making these cute little flowers.


Making the slip knot

Row 1 - ch 3, sl st in 3rd chain from hook to form a circle


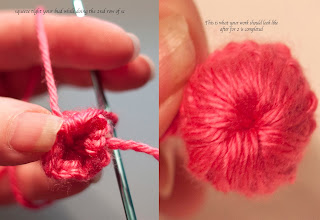
Row 2 - do not sl st to connect to row 1.  Do 10 sc inside the circle again, at the same time squeeze your bud together as you do your sc.  The tighter the bud the higher it will stand up from the petals

The black bub was pulled extremely tight, look how high it stands above the petals compared to the 2 other flowers that were pulled at different tightness


Row 3 - change to smaller size crochet hook, join contrasting yarn
ch 3, dc in the same st as ch 3, ch 3, sl st in the same st as ch 3


Row 4 - repeat row 3,  9 more times around your bud.  Completed flower should have 10 petals


Completed Flowers